


Successfully Submitted
What Is Arduino? A Beginner’s Guide for Kids to Build Their First Robot
By Vaishnavi E
July 29, 2026 (Last Updated) | 8 mins read
Have you ever wondered how a toy car can move on its own, or how a fan turns on when the room gets hot? Something is telling these machines what to do; a small board, similar to Arduino, is quietly running the show behind the scenes.
If you have ever wanted to build your own robot, Arduino is the best place to start. So, what is Arduino, exactly? This guide covers Arduino for beginners and shows how a simple Arduino board can spark an interest in robotics for kids. Let’s find out how it works.
What Is Arduino?
Arduino is a small electronic board with a built-in microcontroller, a tiny computer chip that can be programmed with instructions. You can connect it to lights, motors, sensors, and buzzers, and then write simple code to tell it what to do.
Think of it like a mini brain. Just like your brain tells your hand to pick up a pencil when you decide to write, Arduino takes instructions from you and tells the connected parts what to do.
The best part is that Arduino is made for beginners. You do not need to be an expert to use it. Many learners as young as 7 or 8 build their first working project within a few hours of learning.
Arduino Components
To get started, here are the basic parts of an Arduino board. Each part has its own small job, and together they make the whole board work.
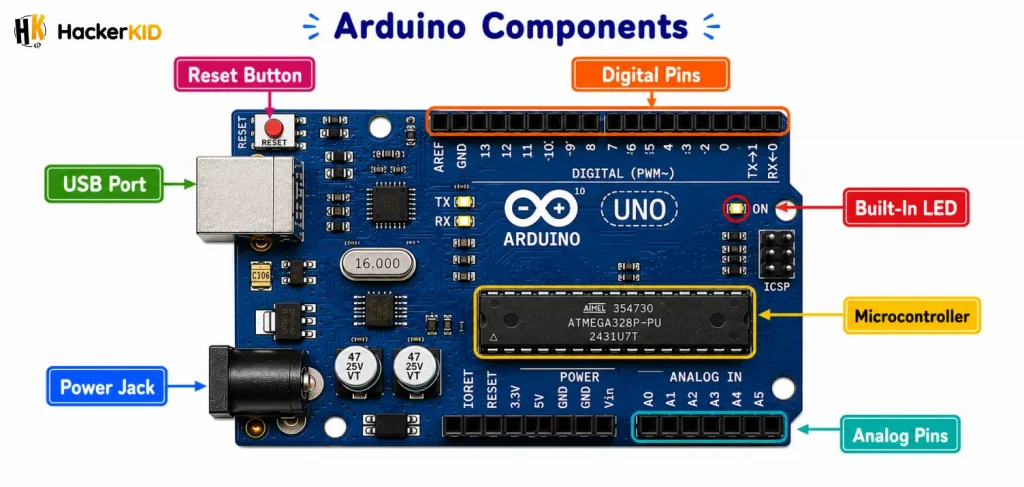
Microcontroller
This is the small chip in the middle of the board. It is the actual brain that reads your code and decides what the board should do. Everything you build depends on this one chip.
USB Port
This port connects the Arduino board to your computer. You use it to upload your code, and it can also power the board while you work.
Power Jack
This lets your Arduino run without being connected to a computer. You can plug in a separate power source through this jack, such as a battery pack or an adapter, so your project can work on its own.
Digital Pins
These pins can only be in one of two states: on or off. Your code decides which state each pin should be in, and the pin then sends that signal out, or reads a signal coming in, to control whatever is connected to it.
Analog Pins
These pins can read values that change gradually, not just on or off. This lets your Arduino understand a wider range of information from the world around it (like temperature, brightness, or sound level), instead of only knowing if something is on or off.
Reset Button
This button restarts your program from the beginning, without erasing the code you uploaded. It is handy when you want to run your project again from scratch.
Built-In LED
Most Arduino boards come with a small LED already attached. This is often the first thing beginners learn to control, usually by making it blink on and off.
Once you understand what each of these parts does, using an Arduino board becomes much less confusing, and connecting the pieces together starts to feel a lot more natural.
You’ve learned what each part of an Arduino board does. Want to discover how Arduino is used in robotics? Check out our Advanced AI Robotics Course for Kids to gain practical, hands-on learning.
Why Do Kids Love Arduino?
Arduino is popular in robotics for kids programs because it turns learning into something you can touch, build, and see working right in front of you.
Here is why it stands out:
- It is beginner friendly, so you do not need years of experience to start
- It gives instant results, so you can see your project light up or move right away
- It is affordable, so you can start with a basic kit
- It works well with robotics, so you can build things like robots, alarms, and smart gadgets
- It builds real skills in coding, electronics, and problem solving, and helps kids learn robotics along the way.
How Does Arduino Actually Work?
An Arduino board works in three simple steps. Once you understand this cycle, every Arduino project, no matter how complex, follows the exact same pattern.
Step 1: You Write Instructions
You write a set of instructions on a computer. These instructions are called code. Arduino uses a simple version of a programming language, so even beginners can read and understand it.
Step 2: You Upload the Code to the Board
After your code is ready, you connect the Arduino board to your computer using a USB cable and send the instructions to it.
Step 3: The Board Follows Your Instructions
Once the code is uploaded, the board starts running it right away, reading through the instructions and controlling whatever is connected to it, like an LED light, a motor, or a sensor.
A Real-Time Example: Building a Traffic Light Model
Let’s understand this with something you may have already seen on the street: a traffic light.
Imagine you want to build a small model of a traffic light using Arduino. Here is what happens:
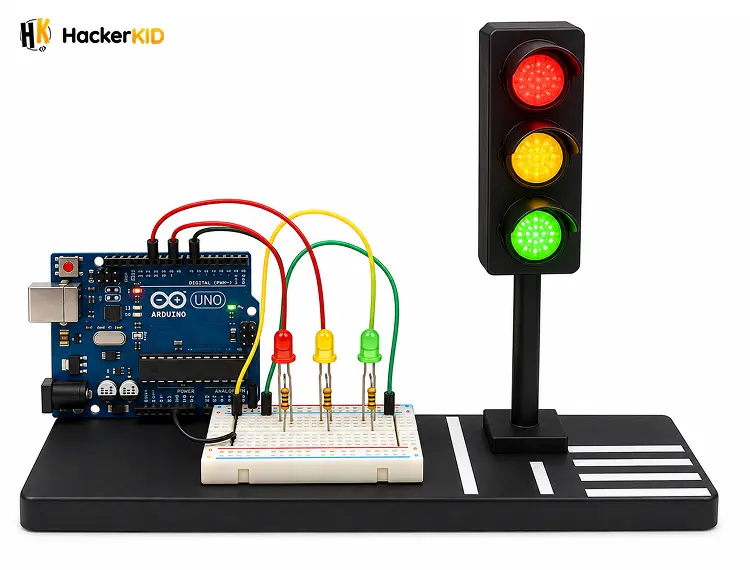
- You connect three LED lights to the Arduino board: red, yellow, and green
- You write code that tells the board: keep the red light on for 5 seconds, then switch to yellow for 2 seconds, then switch to green for 5 seconds, and repeat
- You upload this code to the Arduino board
- The board follows your instructions exactly, and your traffic light model starts working just like a real one
This is not just an experiment. It teaches you how real traffic lights are controlled, how timing works in programming, and how machines follow instructions step by step. The same idea is used in real traffic signals in your city, just on a bigger scale.
Another Example: A Smart Fan That Turns On By Itself
Here is another project many beginners try. Imagine building a fan that turns on automatically when the room feels hot, without you pressing any switch.
How This Project Works
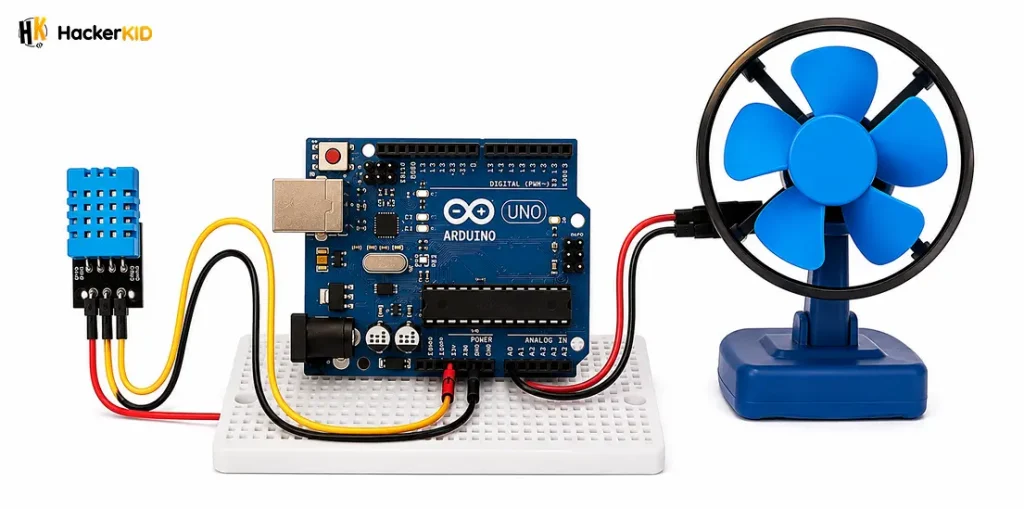
- Connect a temperature sensor to the Arduino board
- Connect a small motor that acts like a fan
- Write code that tells the board: if the temperature goes above a certain number, turn the fan on, and if it drops below that number, turn the fan off
- Upload the code and watch your fan respond on its own when the room gets warm
This is the same basic idea used in real air conditioners and smart home devices. You are not just building a model. You are learning how real-world technology senses the world and reacts to it.
What Do You Need to Start Building With Arduino?
You do not need a big setup to get started. Here is a simple beginner kit:
- An Arduino board (the Arduino Uno is a common choice for beginners)
- A USB cable to connect the board to your computer
- Jumper wires to connect different parts
- A breadboard, which helps you connect components without soldering
- Basic components like LEDs, sensors, buzzers, and small motors
- A computer with the Arduino software installed, which is free to download
Most beginner kits include all of these parts together, so you do not need to buy them one by one.
What Will You Actually Learn From Arduino?
What it gives you is real, practical learning that builds up step by step. You start with small wins, like making a single light blink, and slowly move toward Arduino projects that sense, think, and move on their own, the same process real engineers go through.
The First Stage: Circuits and Basics
When you start with Arduino, you will first learn how to connect simple components like an LED light and make it blink. This teaches you the basics of circuits and how electricity flows.
The Next Stage: Writing Real Code
As you continue, you will learn how to write basic code that tells the board what to do and when to do it. You will make mistakes, fix them, and slowly understand how each line needs to be exact for a machine to follow it correctly.
The Final Stage: Combining Everything
Later, you will start combining sensors, motors, and lights to build projects like the traffic light model or the smart fan example above. This is where you begin to think like a real engineer, planning how different parts work together.
With consistent practice, many kids move on to building actual robots, like a robot that avoids obstacles or a robot that follows a line on the floor.
How to Build Your First Robot With Arduino
Every robot needs three things: a way to sense the world, a way to decide what to do, and a way to move. Arduino gives you all three in one place. Here is a real beginner project that puts this into action: a simple line-following robot that follows a black line drawn on the floor, all on its own.
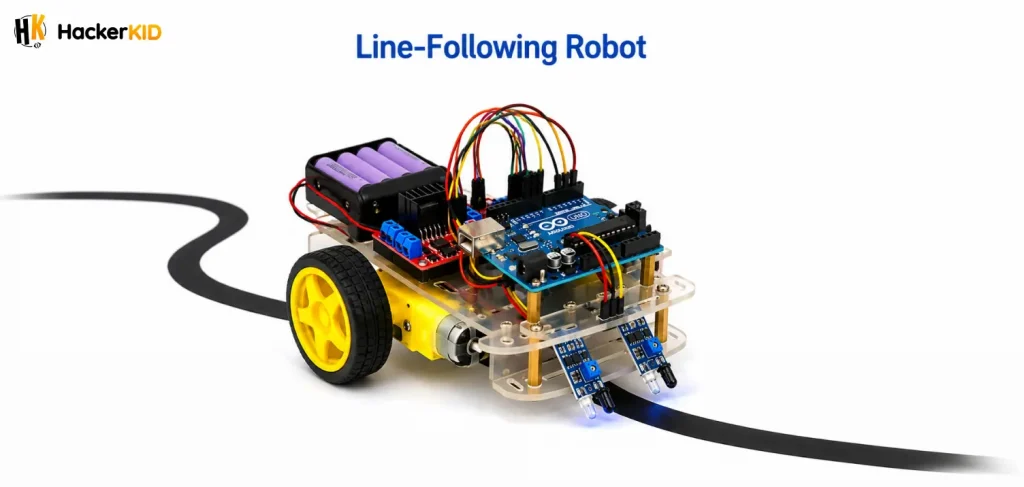
What You Will Need To Build A Line-Following Robot
- An Arduino board
- A small robot chassis with two wheels and two motors
- A motor driver module, which lets the Arduino control the motors safely
- Two IR sensors, which detect the difference between a black line and a light-colored floor
- A battery pack to power the motors
- Jumper wires to connect everything
Here are the steps to build a Line-Following Robot.
Step 1: Build the Base
Attach the two motors and wheels to the robot chassis. This becomes the body of your robot and the part that actually moves.
Step 2: Connect the Motor Driver
Connect the motors to the motor driver module, and then connect the motor driver to the Arduino board. The motor driver acts like a middleman, since the Arduino cannot power the motors directly on its own.
Step 3: Attach the Sensors
Fix the two IR sensors underneath the front of the chassis, one on the left side and one on the right, and wire them to the Arduino. These sensors detect whether they are looking at the dark line or the lighter floor around it.
Step 4: Write the Code
Write code that tells the Arduino: if both sensors see the light floor, move straight ahead. If the left sensor sees the black line, turn left. If the right sensor sees the black line, turn right. Keep checking this again and again as the robot moves.
Step 5: Upload and Test
Upload the code to your Arduino, connect the battery pack, and place your robot on a black line drawn on paper or the floor. Watch it follow the line on its own, correcting itself every time it starts to drift off.
This is not just a simple experiment. The same idea, sensors constantly checking the surroundings and correcting course, is used in automated guided vehicles that move materials around real warehouses and factories. Building this project teaches you how sensing, decision-making, and movement work together.
Beyond this simple robot build, ready to build even smarter robots with AI? Explore our Advanced AI Robotics Course for Kids for a practical, hands-on learning experience.
Final Thoughts
Arduino is one of the best ways for young learners to step into coding, electronics, and robotics. It does not just teach you to follow instructions. It teaches you to think, build, test, and improve.
Now you have learned what is Arduino, how an Arduino board works, and how simple Arduino projects work. Your first robot is closer than you think. Start small and keep building, this is where your journey to learn robotics truly begins.
FAQs
💬 Quick Answers 1. What is Arduino used for?
Arduino is used to build small robotics projects that can sense, think, and move. People use it to control lights, motors, sensors, and buzzers for things like blinking lights, moving robots, and simple smart devices. It is a popular starting point for anyone learning coding and robotics.
2. Is the Arduino board good for beginners?
Yes, the Arduino board is designed with beginners in mind. It uses a simple programming language and clear connections, so even someone with no prior experience can build a working robotics project quickly. This is why it is widely used in beginner coding and robotics courses.
3. What age can kids start using an Arduino board?
Kids as young as 7 or 8 can start using an Arduino board with proper guidance. At this age, they can follow simple steps to connect components and understand how basic code controls them.
4. Is Arduino hard to learn?
Arduino is not hard to learn if you start with simple Arduino projects. The Arduino board is built to be beginner friendly, and small wins like blinking an LED help you understand the basics fast.
5. Do I need coding experience to use Arduino?
No, you do not need any prior coding experience to use Arduino. It is designed for absolute beginners, and its programming language is simple enough to learn as you build your first few robotics projects.
Table of Contents
What Is Arduino?
Arduino Components
Why Do Kids Love Arduino?
How Does Arduino Actually Work?
A Real-Time Example: Building a Traffic Light Model
What Do You Need to Start Building With Arduino?
What Will You Actually Learn From Arduino?
How to Build Your First Robot With Arduino
Final Thoughts
FAQs


Related Posts
What Are Robot Sensors and How Do Robots Use Sensors to Interact With the World?
Close your eyes for a second. Now try to walk across your room. Hard, right? You might bump into a chair …
July 29, 2026 | 7 mins read
Read More
What Is Raspberry Pi for Kids and How Can Kids Use It to Build Robotics Projects?
Technology gives children exciting ways to create, experiment, and solve problems. Raspberry Pi for kids makes this possible by combining …
July 29, 2026 | 8 mins read
Read More

Why Learning Robotics for Kids Today Opens Big Opportunities Tomorrow
Imagine a world where your child doesn't just use technology but creates it. From smart devices to robots that solve …
July 29, 2026 | 7 mins read
Read More